Kelco Drilling Machine
Item #: SH00
TABLE OF CONTENTS
| 1. | General Information |
| 2. | Packing List |
| 3. | Assembly Instructions |
| 4. | Operating Instructions |
| 5. | Maintenance |
| 6. | Warranty |
| 7. | Parts List |
1. GENERAL INFORMATION
The purpose of this manual is to assist the operator in assembling, operating, and maintaining the Kelco Drilling Machine. Read it carefully. It furnishes information and instructions that will help you achieve years of dependable performance.The information in this manual was current at time of printing. Due to possible engineering changes your machine may vary slightly in detail. KELCO Industries reserves the right to design and change the machine as may be necessary without notification.
2. PACKING LIST
Three Separate PackagesMotor Carton
SH00-M
| 1 ea. | 1/8 inch Allen Wrench |
| 1 ea. | � HP motor w/air switch |
| 1 ea. | U-Sharp drill bit w/adapter motor coupling |
| 1 ea. | Set of instructions |
Frame Carton
SH00-F
| 1 ea. | Complete Drilling Machine Frame |
| 1 ea. | Tree Top Guide Assembly |
| 2 ea. | Plastic Wire Ties |
Accessory Carton
SH00-H
| 1 ea. | 6' Top Guide Pole |
| 1 ea. | 3' Motor Actuator Arm Handle |
3. ASSEMBLY INSTRUCTIONS
| 1. | Remove motor from carton. |
| 2. | Slide drill assembly over shaft of motor (leaving 1/32 inch clearance from face of rubber shield). Align allen set screws over key slot in shaft. Tighten both allen set screws firmly using 1/8 inch allen wrench. |
| 3. | Plug in motor, press air switch to test motor and confirm that rotation is counter clockwise when facing drill end of motor. |
| 4. | Remove frame assembly from carton and remove chipboard from base. |
| 5. | Remove motor housing cover by using 7/16 inch wrench to remove the six cap screws. |
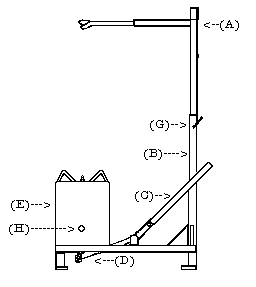
| 6. | Remove the 2 inch x 3/8 inch bolt from lower end of actuator arm (C). |
| 7. | Tip frame on its side with the single square upright flat on the floor and the two round motor rods horizontal at the top. |
| 8. | Pick up the motor assembly, motor down, drill pointed between your knees and slide round motor frame rods through the two square tubes on the motor frame. |
| 9. | Attach the actuator arm (C) to the motor by placing the 3/8 inch bolt through both link bars and the hole in the lower end of the actuator arm. Tighten nut to a loose fit using two 9/16 wrenches. |
| 10. | Remove the two plastic cable ties from the frame and fasten the wire and hose in place. Take care to match the tape straps on both the frame and wire to allow adequate slack for use. |
| 11. | Replace the motor housing cover (E) using the bolts and washers that were removed earlier. Start all six bolts before tightening, to insure proper alignment. |
| 12. | Remove arms from accessory carton. Insert 6' Top Guide Pole (B) in rear upright square tube and actuator handle over actuator arm. |
| 13. | Remove the Tree Top Guide Assembly (A) from EXTRA CARTON included in frame carton. Assemble by inserting Y bar into short end of the L shaped bar and tighten in place. |
| 14. | Place the Tree Top Guide Assembly (A) over the top of the guide pole (B) and adjust to desired position. The height of the tree top guide (A) can be adjusted from both the lower and upper adjusting bolts (G) to a height of almost 8 feet above the drilling deck. When all bolts are tight the guide will be centered above the drill bit. |
| 15. | Plug in machine to 110-volt outlet and test by depressing air switch. Depress once more to shut motor off. |
4. OPERATING INSTRUCTIONS
| 1. | VERY IMPORTANT: Use only a very heavy (12 gauge) extension cord that is as short as possible. A 20-amp breaker is required. |
| 2. | Always hold the tree firm against the top guide while drilling. |
| 3. | WARNING: If you bend the tree while drilling, you will break the drill bit. |
| 4. | Drill the hole by making several short plunges into the trunk, removing the drill completely each time. This allows the chips to clear and the motor to maintain Rpm's. |
| 5. | The motor has overheat protection. If it stops running, you can push the reset button (H) by inserting your finger through the round hole in the side of the motor housing. You will have to wait a short time for the motor to cool down. |
5. MAINTENANCE
At the end of every season; spray WD 40 on the posts that the motor housing slides onto; this will ensure that rust does not become a problem.When not in use; store loose items such as guide poles and actuator arms with machine. This guards against lost parts.
6. WARRANTY
Your Kelco product is sent to you directly from our factory. If you should have any problems that can not be resolved with your machine by the enclosed literature, call us at 1-800-343-4057. If it cannot be corrected, we will send you a new machine.7. PARTS LIST
| SH00 | Twist Drill Bit |
| KPS01 | U-Sharp Drill Bit |
| KPS02 | Receiver for U-Sharp Drill Bit - Needed to Convert from Twist Drill. |


