Kelco Wreath Machine
Item #: K102
TABLE OF CONTENTS
| 1.
| General Information |
| 2. | Packing List |
| 3. | Assembly Instructions |
| 4. | Operating Instructions |
| 5. | Garland Attachment |
| 6. | Maintenance |
| 7. | Warranty |
| 8. | Parts List |
1. GENERAL INFORMATION
The purpose of this manual is to assist the operator in assembling, operating, and maintaining the KELCO Wreath Machine. Read it carefully. It furnishes information and instructions that will help you achieve years of dependable performance.
The information in this manual was current at time of printing. Due to possible engineering changes your machine may vary slightly in detail. KELCO Industries reserves the right to design and change the machine as may be necessary without notification.
2. PACKING LIST
| 1 ea. | Motor & Clutch Assembly |
| 1 ea. | Aluminum Wheel |
| 1 ea. | Roping Attachment |
| 1 ea. | Foot Switch |
| 1 ea. | Switch Box |
| 2 ea. | Idler Wheels |
| 1 ea. | Drive Wheel |
| 1 ea. | Table Top |
| 1 ea. | Table Tray |
| 1 ea. | Tray Brace |
| 1 ea. | Frame Assembly |
| 1 ea. | Hinge Pin |
| 1 ea. | Drive Belt |
| 1 ea. | Clutch Clip |
| 1 ea. | Guard Bracket |
| 2 ea. | Hanger Brackets |
| 1 ea. | Front Guard |
| 4 ea. | Table Legs |
| 1 ea. | Machine Table Bolt Kit |
| 1 ea. | Packing List & Instructions |
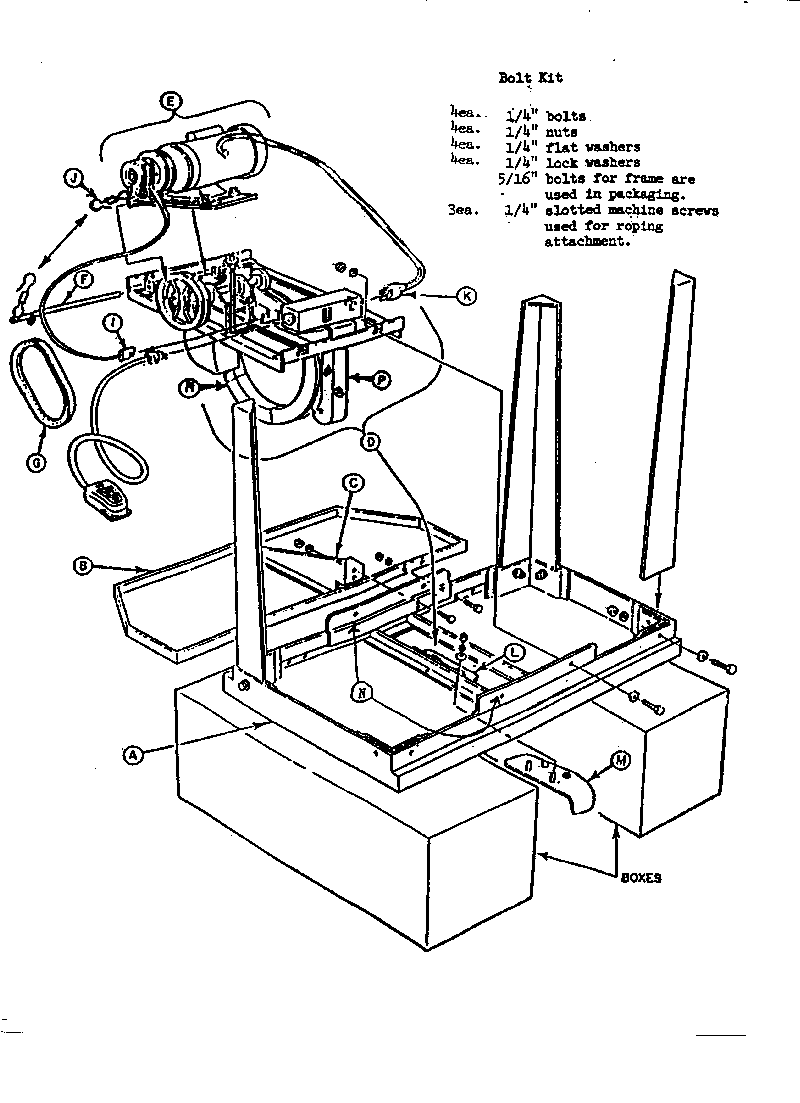
3. ASSEMBLY INSTRUCTIONS
| 1. | Place tabletop (A) on two boxes, 2 to 3 feet high, with the center area clear, and the rear of the table away from you. NOTE: The four holes for mounting tray (B) are on the rear edge of the tabletop. Bolt tray (B) and tray brace (C) to the rear of the table. Use six bolts with lock washers, flat washers and nuts. |
| 2. | Unbolt frame assembly (D) from the packing crate (save the nuts and bolts). Remove the adjustable guide wheel (P) from the frame assembly by loosening the two set bolts. Bolt frame assembly in tabletop as shown, using the four set nuts and bolts from the packing crate and eight 3/8" flat washers. Position the frame so that the black guard is against the right hand edge of the rectangular opening in the table. |
| 3. | Place motor/clutch assembly (E) between the hinge brackets on the frame assembly and insert hinge pin (F) all the way through. Place drive belt (G) on both pulleys making sure they are lined up. Drive belt adjustment is pre-set approximately correct at the factory. There should be a minimum of ½ inch play. Adjust using 9/16" wrench. |
| 4. | Attach clutch clip (J) (on the clutch) to the clip on hinge pin (F). Be sure to secure and lock the clips once they are linked together. |
| 5. | Thread clutch plug & wire (I) through the conduit (metal pipe) on the drive belt side of the frame assembly and insert it into the matching plug on the electrical box. NOTE: This protects the wire so it will not rub against the drive belt. |
| 6. | Plug motor power cord (K) into the socket on the electrical box. |
| 7. | Insert table legs into the corner slots on the tabletop. Bolt with eight ¼" bolts (2 per leg) with flat washers, lock washers and nuts. |
| 8. | Position guard bracket (L) as shown and fasten with two¼" bolts with flat washers. |
| 9. | Attach hanger brackets (N) using five ¼" bolts and washers. |
| 10. | Position front guard (M) from underneath (topside of tabletop) into the guard bracket (L) as shown and attach with two ¼" nuts, flat washers and lock washers and tighten in place. |
| 11. | Attach leaf bracket (A) using two ¼" bolts, nuts, washers, and lock washers. |
| 12. | Attach leaf (C) using four ¼" bolts, nuts, washers, and lock washers. |
| 13. | Turn Kelco Wreath Machine onto its legs. It will take two people, one on each side. |
| 14. | Plug foot pedal (T ) into the electrical box. Place the main wheel in the frame assembly (the tension wheels are on the left when looking from the front of machine). |
| 15. | Replace the adjustable guide wheel (P) (removed in step 3) by sliding down the post until the rubber guide wheel fits gently into the groove on the main wheel. Do not adjust too tight. Secure the guide wheel in position by tightening the two set bolts. |
| 16. | Plug the main power cord (not shown) into any grounded 110-volt outlet and the Kelco Wreath Machine is ready to operate. DO NOT USE A THREE-PRONG PLUG ADAPTER! If an extension cord is used, be sure it is a heavy-duty 12-gauge cord. |
4. OPERATING INSTRUCTIONS
| 1. | Place ring in center of wheel, close gate and turn on switch. |
| 2. | Hold wire to ring in left hand, depress foot switch, and allow several revolutions to attach wire to ring. |
| 3. | Proceed as you would to make wreath by hand, using the machine to do the wrapping function. |
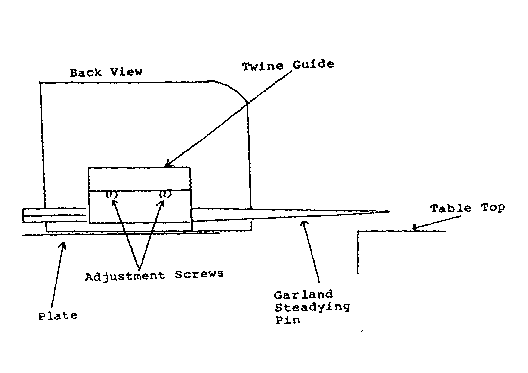
5. GARLAND ATTACHMENT INSTRUCTIONS
| 1. | Fasten garland attachment through three holes in table. Please note that the garland attachment is shipped with the garland-steadying pin not in place. Install by sliding pin through opening beneath twine guide. |
| 2. | Point of garland steadying pin should extend approximately 1" (one inch) over the table top for most garland material. |
| 3. | Garland using short greens, (which is advanced slowly) adjust the pin back ½". |
| 4. | Garland using long greens, (i.e.; cedar, laurel, etc.) adjust the pin forward ½" to 1 inch. |
| 5. | Thread twine core through attachment, set a light tension. |
6. MAINTENANCE
| 1. | Oil (3 in 1 oil recommended) tension wheels and roller lightly, twice a day. |
| 2. | Oil the two guide wheels periodically (once a week when machine is in daily use). Holes are provided in sides of Idler wheel heads. NOTE: Too much oil will spread to groove in main wheel and cause drive wheel to slip. |
| 3. | Before storing Kelco Wreath Machine at end of season, spray WD40 (STRONGLY RECOMMENDED) in and around clutch area. Concentrate the spray toward three metal heads (each approximately the size of a pencil eraser) located on the left-hand side of the clutch as you face machine if making a wreath. You can spray as much and as many times as necessary to insure clutch engages and disengages properly. |
| 4. | At beginning of and during high usage, step 3 is recommended. Spraying of clutch area once a week during your high usage will insure the Kelco Wreath Machine is working at peak efficiency. |
7. WARRANTY
Your Kelco product is sent to you directly from our factory. If you should have any problems that can not be resolved with your machine by the enclosed literature, call us at 1-800-343-4057. If it cannot be corrected we will send you a new machine.
8.PARTS LIST
| K102-CL | Clutch - New |
| K102-CLR | Clutch - Rebuilt (E) |
| K102-MC | Clutch and Motor |
| K102-MCR | Motor and Clutch - Rebuilt (E) |
| K102-AWR | Aluminum Wheel-Rebuilt |
| K102-SRB | Spool Rod Brackets (2) |
| K102-TW | Tension Wheel Set w/Roller |
| K102-DW | Drive Wheel |
| K102-IW | Idler Wheel |
| K102-WG | Wire Guide Bushing |
| K102-TC | Table Complete w/o legs |
| K102-WR | Wire Roller |
| K102-PS | Power Supply |
| K102-RA | Roping Attachment |
| K102-FS | Foot Switch |
| K102-TL | Table Legs |
| K102-TB | Table Tray w/Brackets |
| K102-SB | Switch Box - Complete |
| K102-SR | Spool Rod |


